Tcpdump cheat sheet with examples
Last updated on March 31, 2021 by Dan Nanni
When it comes to network troubleshooting and monitoring, what types of tools you are using make a world of difference. While required tools may vary depending on the types of network problems you are dealing with, there are a set of essential tools that every network administrator must be familiar with, and tcpdump is definitely one of them.
tcpdump is a command-line tool packet sniffing that allows you to capture network packets based on packet filtering rules, interpret captured packet content, and display the result in a human-readable format. The main power of tcpdump comes from its (1) flexible packet filtering rules and (2) versatile protocol dissection capability. Although GUI-based Wireshark provides equally powerful filtering/dissecting capabilities via a more user-friendly interface, its relatively high memory footprint (for buffering packets) and GUI-based operations make Wireshark unsuitable when you are troubleshooting directly from remote headless servers.
Using tcpdump, you can troubleshoot a wide range of network issues including but not limited to:
- Packet loss diagnosis: Detect packet loss and diagnose the cause for dropped packets.
- Application performance: Estimate application-level latency from packet timestamps.
- Rogue DHCP server detection: Discover DHCP responses from unauthorized DHCP servers.
- Multi-homed routing: Verify traffic routing in multi-homed environment.
- Firewall debugging: Troubleshoot packet filtering rules in the firewall.
- VLAN misconfiguration: Monitor VLAN tags carried by traffic from a specific network interface.
- Penetration analysis: Sniff and analyze malicious traffic on local network.
The rest of the post provides a comprehensive tcpdump cheat sheet, which illustrates different types of packet capture scenarios using actual tcpdump examples.
1. Capture Packets from a Specific Network Interface
When running tcpdump, typically you specify, with -i option, which network interface you want to monitor traffic on. If you do not specify a network interface, tcpdump will listen on a default network interface, which is the lowest-number interface in the network interface list. tcpdump -D will show the network interface list.
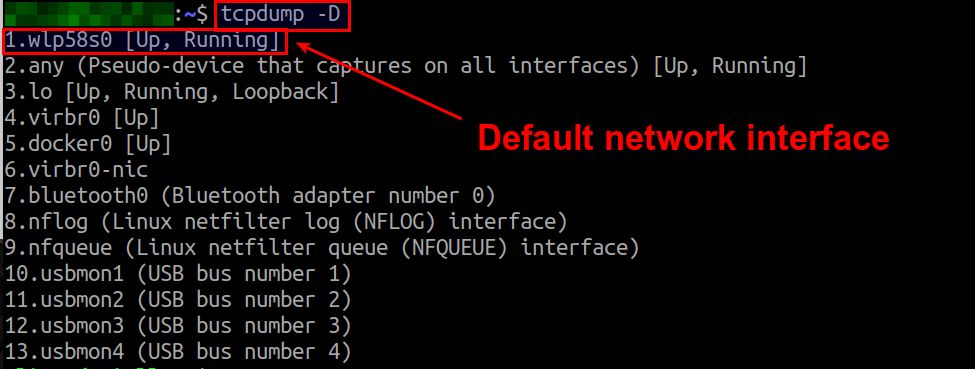
To capture packets received on network interface docker0:
$ sudo tcpdump -i docker0
2. Capture Packets from All Available Network Interfaces
Suppose there are multiple network interfaces on your system, and you want to capture traffic from all those interfaces simultaneously. Exactly for this purpose tcpdump provides a special interface name called "any". Thus, simply run tcpdump with -i any option to capture traffic from all available network interfaces.
$ sudo tcpdump -i any
3. Change the Output Format
To print the layer-2 header information such as MAC addresses:
$ sudo tcpdump -e
13:27:18.002070 9c:b6:d0:fe:4d:95 (oui Unknown) > 48:d6:e5:7b:81:70 (oui Unknown), ethertype IPv4 (0x0800), length 66: xxxx.xxxx.xxxx.33800 > xxxx.xxxx.xxxx.8009: Flags [.], ack 111, win 501, options [nop,nop,TS val 1624743259 ecr 4014866], length 0
To print IP addresses and port numbers without DNS lookup or port name conversion:
$ sudo tcpdump -n
13:30:50.832688 IP 75.135.195.199.443 > 192.168.1.236.35267: UDP, length 45
To adjust the verbosity of output:
$ sudo tcpdump -v
$ sudo tcpdump -vv
$ sudo tcpdump -vvv
4. Capture Packets with a Specific IP Address or a Subnet
To capture packets from a source IP address 8.8.8.8:
$ sudo tcpdump src 8.8.8.8
To capture packets originating from a source subnet 192.168.100.0/24:
$ sudo tcpdump src net 192.168.100.0/24
To capture packets with a destination IP address 10.0.0.1:
$ sudo tcpdump dst 10.0.0.1
To capture packets with a destination address prefix 192.168.100.0/24:
$ sudo tcpdump dst net 192.168.100.0/24
5. Capture Packets between Two Hosts or Two Subnets
To capture packets from 10.10.0.1 to 192.168.100.54:
$ sudo tcpdump src 10.10.0.1 and dst 192.168.100.54
To capture packets from source network 10.10.0.0/24 to destination network 192.168.100.0/24:
$ sudo tcpdump src net 10.10.0.0/24 and dst net 192.168.100.0/24
To capture packets between 10.10.0.1 and 192.168.100.54 in both directions:
$ sudo tcpdump host 10.10.0.1 and host 192.168.100.54
To capture packets between two subnets 10.10.0.0/24 and 192.168.100.0./24 in both directions:
sudo tcpdump net 10.10.0.0/24 and net 192.168.100.0/24
6. Capture Packets with a Specific Network Protocol
tcpdump allows you to capture network traffic with a specific network protocol. For well-known layer-3 or layer-4 protocols, you just need to specify their names. For other types of transport protocols (e.g., DHCP, DNS, SSH), you can filter them based on their port numbers (shown next).
To capture IP packets only:
$ sudo tcpdump ip
To capture ICMP packets only:
$ sudo tcpdump icmp
To capture ARP (request/response) packets only:
$ sudo tcpdump arp
To capture IPv6 packets only:
$ sudo tcpdump ip6
To capture TCP packets only:
$ sudo tcpdump tcp
To capture UDP packets only:
$ sudo tcpdump udp
To capture TCP packets between 10.10.0.1 and 192.168.100.54 in both directions:
$ sudo tcpdump tcp and host 10.10.0.1 and host 192.168.100.54
7. Capture Packets with Specific TCP/UDP Port(s)
To capture packets with destination port 80:
$ sudo tcpdump dst port 80
To capture UDP packets with source port 4001:
$ sudo tcpdump udp src port 4001
To capture SSH packets (either source or destination port 22):
$ sudo tcpdump port 22
To capture DNS packets (either source or destination port 53):
$ sudo tcpdump port 53
To capture packets with port 80 or 8000:
$ sudo tcpdump port 80 or port 8000
To capture packets with TCP port 80 or UDP port 4001:
$ sudo tcpdump 'tcp port 80 or udp port 4001'
To capture packets with port numbers between 800 and 900:
$ sudo tcpdump portrange 800-900
To capture TCP packets with destination port range of [8000, 8010]:
$ sudo tcpdump tcp dst portrange 8000-8010
8. Capture All Packets Excluding My Own SSH Session
If my SSH session is originating from 192.168.100.250:
$ sudo tcpdump port not 22 and not host 192.168.100.250
9. Capture the First N Number of Packets
To capture the first 100 TCP packets:
$ sudo tcpdump -c 100 tcp
10. Capture Packets with Specific Packet Length
To capture packets whose length are greater than 200 bytes:
$ sudo tcpdump greater 200
To capture TCP packets with destination port 80, and whose size are smaller than 200 bytes:
$ sudo tcpdump tcp dst port 80 and less 200
Note that the greater and less operators check the length of an entire packet, including all headers (e.g., Ethernet, IP, TCP headers).
To capture packets with packet size between 200 and 500 bytes:
$ sudo tcpdump not less 200 and not greater 500
11. Capture Packets with Specific MAC addresses
You can filter packets by MAC address with the ether qualifier.
To capture layer-2 broadcast traffic (i.e., packets with destination MAC address ff:ff:ff:ff:ff:ff):
$ sudo tcpdump ether dst ff:ff:ff:ff:ff:ff
To capture packets between e8:2b:88:ef:55:11 and 9c:b6:d0:ee:fd:90 in both directions:
$ sudo tcpdump ether host e8:2b:88:ef:55:11 and ether host 9c:b6:d0:ee:fd:90
To capture packets sent to or received by e8:2b:88:ef:55:11:
$ sudo tcpdump ether host e8:2b:88:ef:55:11
12. Print the Payload of Captured Packets
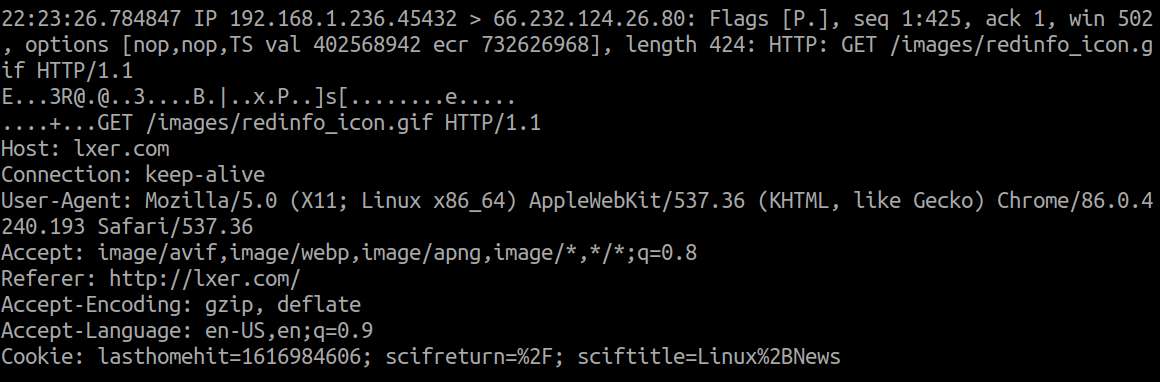
To print the payload of captured TCP packets in ASCII format:
$ sudo tcpdump -A tcp
Printing packet payload in ASCII format can be useful to inspect (unencrypted) HTTP protocol headers. For example:
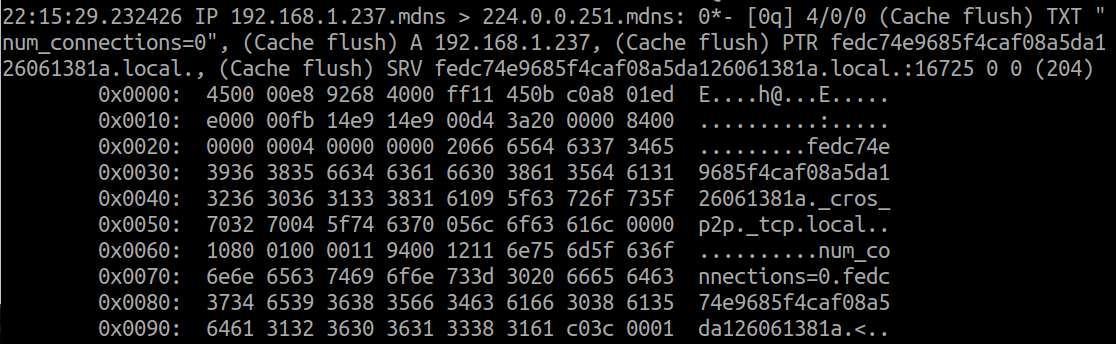
To print the payload of captured packets in hexadecimal format:
$ sudo tcpdump -X
13. Save Captured Packets to a File, and Read Packets from a File
To save the first 1000 packets to a file trace.pcap:
$ sudo tcpdump -c 1000 -w trace.pcap
To read only TCP packets from a file trace.pcap:
$ tcpdump -r trace.pcap tcp
14. Rotate Packet Capture Files by Time and Size
When you dump captured packets to a file, the capture file can grow quickly depending on the rate of incoming packets. So you want to rotate capture files regularly.
To rotate capture files every hour or every 500 MB, whichever comes first:
$ sudo tcpdump -w /tmp/trace -W 24 -G 3600 -C 500
This will create 24 capture files (/tmp/trace00, /tmp/trace01, ..., /tmp/trace23) in 24 hours. After that, it will overwrite the files from the beginning.
To rotate capture files every 30 minutes and name the capture files with collected timestamps:
$ sudo tcpdump -w /tmp/trace-%Y-%m-%d_%H-%M.pcap -G 1800
This will create a new trace file every 30 minutes with the following names.
/tmp/trace-2021-23-29_12-00.pcap
/tmp/trace-2021-23-29_12-30.pcap
/tmp/trace-2021-23-29_13-00.pcap
/tmp/trace-2021-23-29_13-30.pcap
. . .
15. Capture Packets with High-Resolution Timestamp
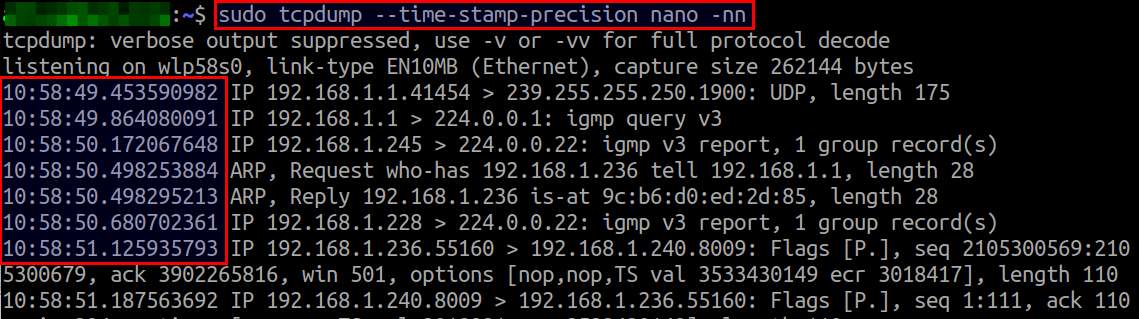
By default tcpdump use micro-second resolution for timestamping packets. However, tcpdump version 4.6 or later supports nano-second resolution timestamp.
To capture packets with nano-second resolution:
$ sudo tcpdump --time-stamp-precision nano
16. Capture Packets with Different Timestamp Formats
To print packet timestamp with Unix epoch time (seconds since January 1, 1970):
$ sudo tcpdump -tt
1617031894.463313 IP 192.168.1.236.35627 > 193.194.206.100.443: UDP, length 1350
To print packet timestamp as the date followed by hours, minutes, seconds, and microseconds:
$ sudo tcpdump -tttt
2021-03-29 11:33:57.181125 IP 192.168.1.236.52472 > 200.189.40.8.123: NTPv4, Client, length 48
To print relative timestamp (since the first packet captured):
$ sudo tcpdump -ttttt
00:00:00.000000 IP 192.168.1.228.49669 > 255.255.255.255.1947: UDP, length 40
00:00:00.205198 IP 185.199.206.189.443 > 192.168.1.236.35627: UDP, length 44
00:00:00.211631 IP 192.168.1.236.35627 > 173.194.206.189.443: UDP, length 33
00:00:02.356055 ARP, Request who-has 192.168.1.1 tell 192.168.1.204, length 46
To print packet timestamp in a specific time zone:
tcpdump prints packet timestamp in the default timezone of your Linux system. If you want to show timestamp in a different timezone, you can specify the timezone in TZ environment variable before calling tcpdump.
$ sudo TZ=America/New_York tcpdump
$ sudo TZ=Europe/London tcpdump
$ sudo TZ=Asia/Seoul tcpdump

17. Capture TCP Control Packets
tcpdump's expressive filter allows you to check for any arbitrary byte ranges in a packet. Using this capability, for example, you can capture TCP packets with particular flags in their TCP headers.
To capture TCP SYN packets:
$ sudo tcpdump "tcp[tcpflags] & (tcp-syn) != 0"
Conclusion
That's the end of the tcpdump cheat sheet. As you have seen here, only the sky is the limit when it comes to packet-level monitoring with tcpdump. If you want to share your own tcpdump examples, feel free to post them in the comment.
Support Xmodulo
This website is made possible by minimal ads and your gracious donation via PayPal or credit card
Please note that this article is published by Xmodulo.com under a Creative Commons Attribution-ShareAlike 3.0 Unported License. If you would like to use the whole or any part of this article, you need to cite this web page at Xmodulo.com as the original source.

Xmodulo © 2021 ‒ About ‒ Write for Us ‒ Feed ‒ Powered by DigitalOcean