How to find the IP address of a KVM virtual machine
Last updated on January 20, 2021 by Dan Nanni
When you have a guest virtual machine (VM) created with KVM hypervisor, there are circumstances where you want to find out its IP address. For example, you are running the VM on a remote headless server, and you have trouble accessing the VM's login console, either because the server does not enable remote VNC console access, or because virsh console on the server does not work for some reason. Without knowing the IP address of the VM, you cannot SSH to the VM.
In this situation, let's say the only access you have is the KVM hypervisor server where the VM is running. Then how can you find out the IP address of the VM?
It is certainly possible to find out the VM's IP address without logging into the VM via console or SSH. Instructions vary depending on what type of guest networking is being used for your VM: NAT networking or bridged networking. In the following, I describe how to discover a VM's IP address with KVM hypervisor in each of these cases.
NAT Networking
In KVM/libvirt-based virtualization, NAT-based networking is commonly used for guest VMs since the default network for VMs (unless you specify otherwise) is NAT-based virtual network. On most Linux distrutions, libvirt automatically creates a default NAT bridge named virbr0. If you want, you can also create custom virtual networks for your VMs using libvirt tools (e.g., virsh, virt-manager), which will create corresponding NAT bridges. Each of these (default or not) NAT bridges has its own private subnet assigned (e.g., 192.168.122.0/24 for virbr0 on Ubuntu), and your VM will be assigned a private IP address from the subnet associated with whichever NAT bridge it is connected to. For IP address assignment, libvirt operates a dedicated DHCP server (dnsmasq) for each NAT bridge.
If your VM is using NAT networking, you can easily find out its IP address from the command line as follows.
$ virsh net-dhcp-leases <network-name>

In the above, I specify the default network (which is named default). The output of the command indicates that there are two VMs running, and that they are assigned 192.168.122.240 and 192.168.122.104.
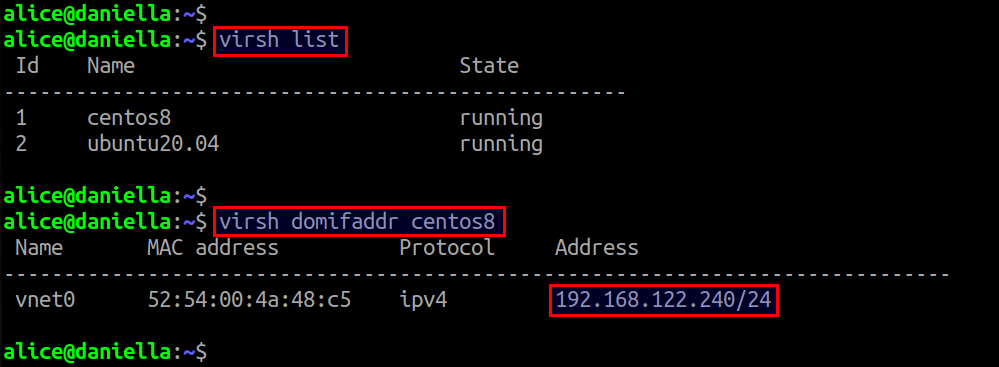
Alternatively, you can first find out the name of your VM with:
$ virsh list
Then get the IP address of your VM by running:
$ virsh domifaddr <your-VM-name>
Bridged Networking
Downside of NAT-based networking is that your guest VM is hidden behind the NAT bridge and not accessible outside of the hypervisor server without complex port forwarding or IP masquerading. Alternative guest networking is bridged networking, where the virtual interface of your VM is connected to the outside local network through the KVM host's physical interface. In this case, the VM's IP address is not under libvirt's DHCP control. Rather, the VM is assigned an IP address by the DHCP server running on the bridged local network. Naturally, this IP address is not visible to libvirt.
To find out the IP address of a VM with bridged networking, you can use a command-line tool called dhcpdump. Using this tool, you can monitor the DHCP request/response that your VM exchanges with an external DHCP server.
For example, suppose your VM is bridged to the local network via bridge called br0. Then run the following command to monitor your VM's DHCP communication:
$ sudo dhcpdump -i br0
While dhcpdump command is running, power on your VM, and wait for DHCP traffic to appear on the screen.
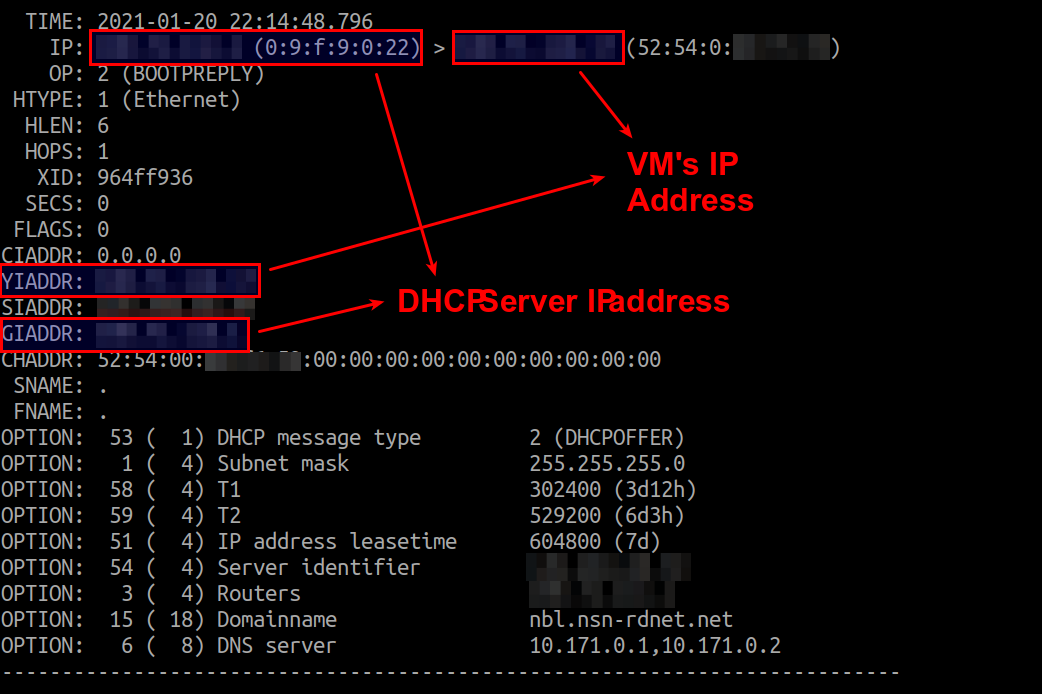
The output of dhcpdump includes the DHCP IP address as well as an DHCP server's address. The IP address assigned to your VM via DHCP will appear in YIADDR field as shown above.
If you are interested in finding out the IP address of a VM created with VMware product, refer to this tutorial.
Support Xmodulo
This website is made possible by minimal ads and your gracious donation via PayPal or credit card
Please note that this article is published by Xmodulo.com under a Creative Commons Attribution-ShareAlike 3.0 Unported License. If you would like to use the whole or any part of this article, you need to cite this web page at Xmodulo.com as the original source.

Xmodulo © 2021 ‒ About ‒ Write for Us ‒ Feed ‒ Powered by DigitalOcean