How to set up NFS server and client on CentOS 7
Last updated on October 22, 2020 by Dan Nanni
NFS is a distributed file system protocol built on top of Sun's RPC (remote procedure call). NFS is popularly used to share directories and files in LAN network environments, and is also adopted in many Network Attached Storage (NAS) systems and cloud storage backends. In a typical NFS deployment, an NFS server exports part of its local file system as NFS shares, and one or more remote NFS clients mount and access exported shares within their own file system.
Here is how to set up an NFS share between an NFS server and a client, both running on CentOS 7.
Preparation
In this tutorial, two CentOS 7 hosts will be used, one for an NFS server and the other for an NFS client. Many read/write operations in NFS involve accessing and updating timestamps, but NFS itself does not have any mechanism to synchronize time between a server and a client. For reliable NFS operations, it is thus highly recommended to set up NTP on every NFS server and client host to avoid any clock skew among them.
Set up an NFS Server on CentOS 7
Install necessary NFS daemons and utilities with yum:
$ sudo yum install nfs-utils
Next prepare a folder to export via NFS. In this example, I am going to export /var/nfs of local filesystem.
$ sudo mkdir /var/nfs
$ sudo chmod 777 /var/nfs
Now open /etc/exports with a text editor, and specify this folder with additional export options as follows.
/var/nfs 192.168.1.0/24(rw,sync,no_subtree_check)
The export options used indicate the following. Obviously you can customize the options to meet your requirements.
- 192.168.1.0/24:: Only NFS clients with IP addresses from 192.168.1.0/24 can access the NFS share. Other forms of ACLs (e.g., 192.168.1.175, *.xmodulo.com) are also possible.
- rw: This option allows NFS clients to perform both read and write on the share.
- sync: This option makes the NFS server reply to a write request only after the write is successfully committed to the storage, which improves reliability at the cost of performance.
- no_subtree_check: This option disables subtree checking which verifies that an accessed file has correct permissions and belongs to the exported tree. Disabling subtree checking can improve performance at the cost of security.
Next, start necessary services and set them to auto-start upon boot.
$ sudo systemctl enable rpcbind
$ sudo systemctl start rpcbind
$ sudo systemctl enable nfs-server
$ sudo systemctl start nfs-server
If you modify /etc/exports, you need to activate the change by running:
$ sudo exportfs -a
Finally, you should open up the port used by NFS service in the default firewall as follows.
$ sudo firewall-cmd --zone=public --add-service=nfs --permanent
$ sudo firewall-cmd --zone=public --add-service=rpc-bind --permanent
$ sudo firewall-cmd --zone=public --add-service=mountd --permanent
$ sudo firewall-cmd --reload
To check if the folder is successfully exported, run:
$ sudo exportfs
/var/nfs 192.168.1.0/24
The output should indicate what folders (e.g., /var/nfs) are exported to whom (e.g., 192.168.1.0/24).
Set up an NFS Client on CentOS 7
Now let's see how we can set up a remote NFS client to mount and access the exported NFS share.
On a separate CentOS 7 host, install necessary NFS daemons and utilities.
$ sudo yum install nfs-utils
Prepare a local mount point for an NFS share.
$ sudo mkdir /mnt/nfs
Go ahead and mount a remote NFS share with mount command as follows. In this example, the NFS server's IP address is 192.168.1.174.
$ sudo mount -t nfs 192.168.1.174:/var/nfs /mnt/nfs
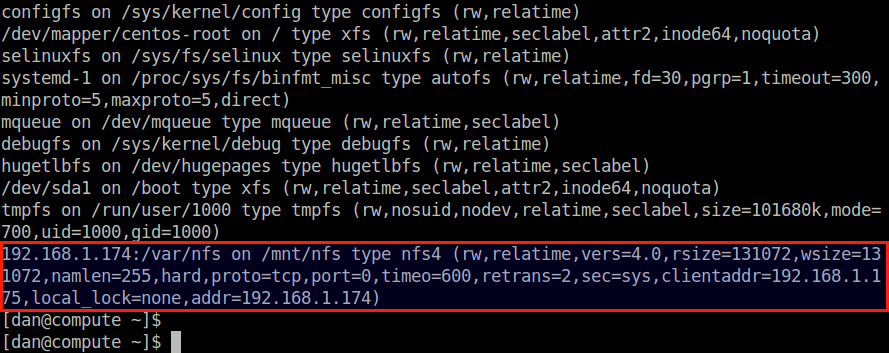
To verify that a remote NFS share is successfully mounted, run mount command without any argument, and check if the output contains the mounted NFS share.
$ mount
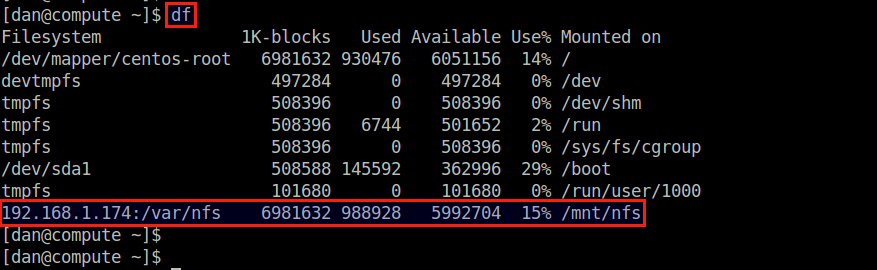
The df command should show extra storage from the NFS share.
To unmount the NFS share, use umount command.
$ sudo umount /mnt/nfs
If you want to have a remote NFS share automatically mounted upon boot, you can add the following line in /etc/fstab.
$ sudo vi /etc/fstab
192.168.1.174:/var/nfs /mnt/nfs nfs defaults 0 0
Note that the mounted NFS share changes the ownership of any file created by the root to the nfsnobody user. This is an NFS feature called root squash, which essentially reduces the access right of the remote superuser for security reasons. You can disable root squash by using no_root_squash export option, but is not recommended as any remote root user could accidentally mess up shared folders with root privilege.
Support Xmodulo
This website is made possible by minimal ads and your gracious donation via PayPal or credit card
Please note that this article is published by Xmodulo.com under a Creative Commons Attribution-ShareAlike 3.0 Unported License. If you would like to use the whole or any part of this article, you need to cite this web page at Xmodulo.com as the original source.

Xmodulo © 2021 ‒ About ‒ Write for Us ‒ Feed ‒ Powered by DigitalOcean