How to get started with Vagrant on Linux
Last updated on March 17, 2021 by Alfonso Silva
Professional DevOps teams often deploy their development system in a virtualized environment. Virtualization allows DevOps teams to easily and quickly replicate necessary OS environments to build, test and deploy their development system on. These disposable virtual environments show how flexible and powerful virtualization can be when properly understood and managed. However, this flexibility, while advantageous, can bring some administrative difficulties that Vagrant aims to correct. Therefore, we have prepared this tutorial to help you understand the power of Vagrant and to guide you to quickly develop hands-on skills with Vagrant.
Introduction
Vagrant is an open-source, command-line based tool, available for Windows, MacOS, and GNU/Linux, that allows generating reproducible and sharable development environments in an automated fashion. To this end, Vagrant creates and configures virtual machines or lightweight containers from a simple configuration file that can easily be shared with other team members to ensure the uniformity of the systems on which they work. Vagrant is essentially thin management software that sits on top of virtualization hypervisor or container run-time for any types of custom provisioning on virtual environments. By default, Vagrant uses VirtualBox as a underlying virtual machine engine, although there are options to use VMware Workstation, KVM or Docker instead.
Why Use Vagrant?
When developing a project as a team or working from different computers, it is possible that development setup or OS configurations are not the same across different environments. This can be something simple to solve, or it can be a real headache because we have to find out what we configured is wrong or why on one machine it works and not on another.
Setting up the same working environment over and over again is a repetitive and exhausting job that nobody wants to do. So using virtual machines might seem like the most logical solution. However, provisioning and deploying virtual machines on a large scale can also become repetitive and burdensome, and that's where Vagrant comes in.
Vagrant can install and configure a virtual machine with a simple configuration file. So just share the file and run it from a terminal, and a new virtual machine with right configuration will automatically be created for you. Behind the scene, Vagrant will configure user credentials, shared folders, SSH connections, create HTTP tunnels, etc., all according to the specified configurations.
Since the virtual machine configuration is a simple plain text file, we can include it in a version-controlled repository, along with the rest of the project's code. This way, a new developer joining the team can simply clone the project repository and run Vagrant to have the exactly same development environment as the rest of the team up and running.
Install Vagrant on Ubuntu Server 20.04
For distributions such as Debian or Ubuntu, the installation process is quite simple because Vagrant is in the official repositories. However, the version from the official website is the latest version available, so it is a good idea to download the package from the official source to make sure you have the latest stable version.
In a terminal environment, first upgrade the distribution:
$ sudo apt update
$ sudo apt upgrade
We are going to use VirtualBox as a virtualization hypervisor for Vagrant. Therefore, before installing Vagrant, it is necessary to install VirtualBox.
$ sudo apt install virtualbox
Once the process is finished you need to check which is the latest stable version of Vagrant. You can do this from the project's website.
At the moment, the latest stable version of Vagrant is 2.2.14, whose DEB package for Ubuntu can be downloaded using wget.
$ cd /tmp/
$ wget -c https://releases.hashicorp.com/vagrant/2.2.14/vagrant_2.2.14_x86_64.deb
After downloading the latest stable version of Vagrant, you can install it with apt.
$ sudo apt install ./vagrant_2.2.14_x86_64.deb
This will start the process of installing dependencies and Vagrant itself. After that, you will be able to start using Vagrant.
For example, check the installed version with:
$ vagrant --version
Vagrant 2.2.14
Install Vagrant on Debian 10
Debian is one of the most popular and dependable Linux distros. So it makes sense to know how to install Vagrant on the latest Debian release.
First, you have to fulfill the VirtualBox dependency. As this package is not in the official repositories, you have to add the Oracle repository for Debian. So open a terminal and run the following commands to install a required package.
$ sudo apt update
$ sudo apt install software-properties-common
Now, import the GPG keys from the repository into the system. This secures the process and tells the system that the repository is trusted.
Next, add the repository by running the following line at the end of the /etc/apt/sources.list file:
deb [arch=amd64] https://download.virtualbox.org/virtualbox/debian buster contrib
Now you can install Vagrant by running:
$ sudo apt update
$ sudo apt install vagrant
You can check if the installation was successful by running:
$ vagrant --version
vagrant 2.2.14
Install Vagrant on CentOS 8
In the case of CentOS 8, the process is also simple and even somewhat similar. First, you have to install VirtualBox which is not in the official repositories of the distribution. You can install it with an external repository.
To add the VirtualBox on CentOS 8 repository, just run:
$ sudo dnf config-manager --add-repo=https://download.virtualbox.org/virtualbox/rpm/el/virtualbox.repo
Now you can install the VirtualBox package:
$ sudo dnf install VirtualBox-6.0
During the process, you will have to accept the GPG key from the repository. Accepting it will start the process.
With VirtualBox installed on the system, proceed to install the latest stable version of Vagrant, but unlike the previous section, we need to download the RPM package for CentOS 8.
To do this, you can use the following command:
$ sudo dnf install https://releases.hashicorp.com/vagrant/2.2.14/vagrant_2.2.14_x86_64.rpm
Remember that the command will change when a new stable version of Vagrant is released, so keep an eye on it.
Then, you can check that Vagrant is properly installed by displaying the installed version:
$ vagrant --version
Vagrant 2.2.14
First Steps with Vagrant
Once Vagrant is installed and configured correctly, you need to define where your new project will be located (so-called "project directory"). The location of a project directory is up to you and is defined by creating a new folder where your project will be hosted. The project directory will later have a configuration file named Vargantfile created by Vagrant, which is where Vagrant stores all the settings for this project.
Go ahead and create a project directory with sufficient permissions for the current user.
$ mkdir vagrant-project
You can replace vagrant-project with any name and location you want.
Then, move into the project directory.
$ cd vagrant-project
Once you are inside the directory, you need to tell Vagrant that this is where you will have your project. To do this, run the vargrant init subcommand.
$ vagrant init

After initialization, a skeleton Vagrantfile file will be created. What this file will define includes: the location of the base directory for the project, the type of machine and resources we need to run the project, and the software you need to install, and how you want to access it, etc. You can edit Vagrantfile just like any text file.
The next step is to add a virtual machine, or a box as Vagrant calls it. There are many pre-defined boxes that you can download, and you can check the list of available boxes from the official catalog.
When you have chosen the virtual machine you want to create, you can add it simply by running:
$ vagrant box add [box-name]
This will trigger downloading the image of a chosen box. In this tutorial, I add a Ubuntu 18.04 vagrant box, and use VirtualBox to instantiate it.
$ vagrant box add hashicorp/bionic64
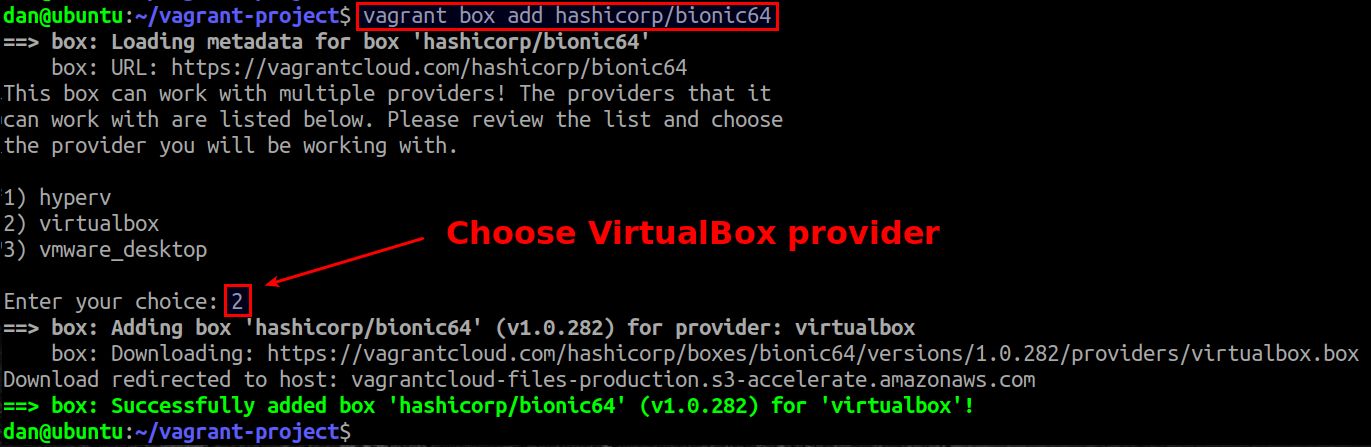
Boxes are locally stored on the computer where Vagrant is set up. Each Vagrant project uses an installed box as a base image to clone from, and never actually modifies the base image itself. If you have two projects both using the same box you just added, adding/modifying files in one guest virtual machine will not affect the other guest machine.
To start using the virtual machine, run:
$ vagrant up
This will power on the virtual machine.
Accessing and Stopping the Newly Created Box
Vagrant allows SSH access to the virtual machine that is already created. To do this, simply run:
$ vagrant ssh
This will allow you to access the command line of the virtual machine and do all the usual things on a GNU/Linux machine.
By default, Vagrant configures the current directory (the directory from where vagrant init has been done, and where Vagrantfile is) as a shared directory with the virtual machine. That means that for all the files that are there, the virtual machine will be able to access them.
If you want to stop the virtual machine you have three options:
vagrant suspend: Pauses the virtual machine, saving the current state on the hard disk. The commandvagrant upwill restart the machine instantly with the exact state where it was left off.vagrant halt: Performs a controlled shutdown of the virtual machine (the same as shutting down a physical machine).vagrant destroy: Destroys the virtual machine and all its contents.
So you can run the one that suits your needs.
Configuring the Box with the Vagrant File
The power of Vagrant lies in its Vagrantfile which can be edited like a normal file, and which allows you to perform many different operations.
To edit it, you can use a text editor of your choice.
$ nano Vagrantfile
Some of the typical configurations you can define in Vagrantfile are:
config.vm.hostname = "example".
Which allows you to define the hostname of the virtual machine.
Inside the configuration section, you can also change or add these parameters:
vb.name = [name]
vb.memory = 512
vb.cpus = 2
In this case we are assigning 512Mb of RAM and two processor cores.
You can also add a script of commands that will be executed when you start the virtual machine. This can be handy if you want to perform one-time installation or startup configuration on your virtual machine. Under the vb.vm.provision "shell" section, add the commands you want to be executed as soon as the virtual machine starts up. For example:
vb.provision "shell", inline: <<-SHELL
apt-get update
apt-get upgrade
apt-get install apache2 -y
SHELL
This will install Apache HTTP server as soon as the virtual machine is up. If the virtual machine is already up and running, reload it by running:
$ vagrant reload --provisioning
This way, you will see how that package will be installed.
In general, the startup script can be much more complex installing necessary tool chains and setting up an in-house development environment, so that everyone who runs it will have the same working environment as you.
Enabling the Network
An essential aspect of the virtual machine is the network, so in the Vagrantfile locate the config.vm.network or similar section.
You have three network options:
- Port forwarding: do a port mapping so that traffic coming to a port on the host (physical machine) is redirected to a port on the virtual machine.
- Private network: create another private network that is only accessible from the host.
- Bridged network: make the guest behave as another machine within the host's local network.
When you choose the one that suits your needs, you can uncomment the line or add the following line:
config.vm.network : bridge_network
Save the file and to apply the changes, run:
$ vagrant reload
This way you can configure your whole virtual machine from a simple text file.
Conclusion
Vagrant is a handy DevOps tool that aims to streamline your development workflows by automating the provision of customized virtual machine environments. It provides a management interface for virtualization, where you can configure everything you need in your virtual machines from a simple text file. The best of all is that this file can be shared among your DevOps team members who will get virtual machines that are pre-configured according to your needs.
Hopefully this tutorial provides enough knowledge for you to easily get started with Vagrant. Any comment or feedback on missing useful features of Vagrant is quite welcome.
Support Xmodulo
This website is made possible by minimal ads and your gracious donation via PayPal or credit card
Please note that this article is published by Xmodulo.com under a Creative Commons Attribution-ShareAlike 3.0 Unported License. If you would like to use the whole or any part of this article, you need to cite this web page at Xmodulo.com as the original source.

Xmodulo © 2021 ‒ About ‒ Write for Us ‒ Feed ‒ Powered by DigitalOcean