How to create a Linux virtual machine step by step in Microsoft Azure
Last updated on January 30, 2021 by Dan Nanni
Azure is a cloud computing platform from Microsoft, which features a comprehensive suite of cloud services delivered on demand for users over the Internet. A growing range of Azure cloud services include traditional infrastructure-as-a-service (IaaS), as well as more sophisticated "managed" services such as database, messaging, identity, CDN, machine learning, etc. Leveraging these cloud services, users can easily deploy and scale their applications on Azure cloud without investing in their in-house infrastructure.
Azure is not just for large businesses or startups, but also can be great for your personal DIY projects as well. For example, you can set up your own VPN server on Azure, and in any geographic location of your choice (among 60+ regions worldwide). You can hook up your at-home IoT devices with Azure cloud for home automation. Or you can run your own Minecraft server in a close-by Azure location and play Minecraft with your friends with no lag. Compared to traditional web hosting, two main advantages of using Azure for personal use are its pay-as-you-go pricing and wide geographic spread; you only pay for what you use each month without any upfront fees, and you can rent cloud services nearest to where you are.
Azure free tier: In case you are not aware, Azure provides "free tier" for new Azure users. The free-tier includes $200 credits for the first 30 days, and popular free services for the first 12 months. You don't need to add your credit card information to Azure to utilize the free-tier. So this is a great opportunity for you to explore Azure without spending a single penny.
For those of you who are new to Azure, I present in this tutorial a step-by-step guide to create a Linux virtual machine (VM) on Azure platform using Azure Portal interface. The demonstration will focus on creating a Linux VM with Ubuntu 18.04 LTS image, but you can easily switch to any other Linux images supported by Azure.
Step One: Access Azure Portal
Azure Portal is a unified hub for Azure, where you can access various Azure services interactively via a well-designed web interface. In the rest of this tutorial, I am going to use the Azure Portal interface to demonstrate the procedure.
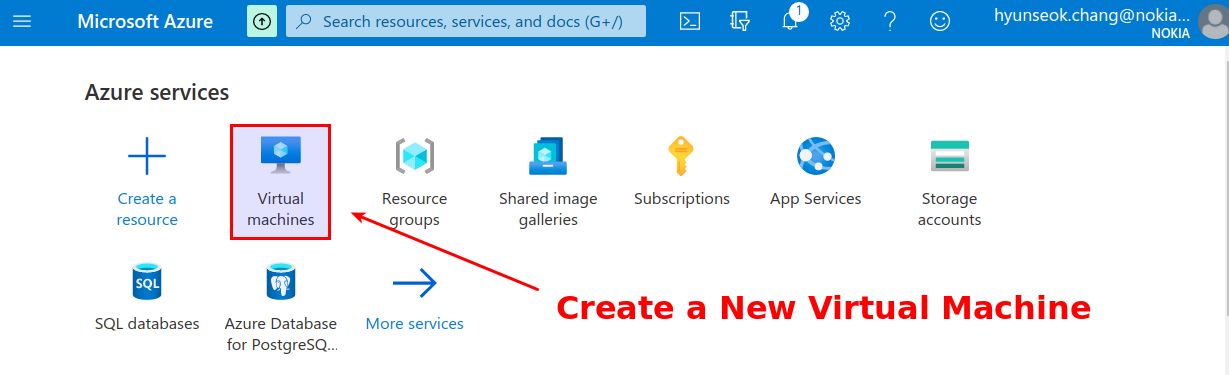
The first step to creating a VM is to log in to Azure Portal and click on "Virtual machines".
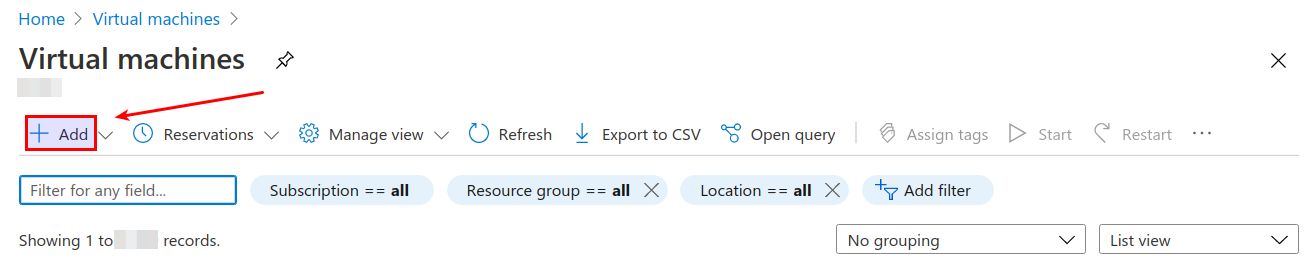
Then on the next screen, click on Add button.
Step Two: Create a Resource Group
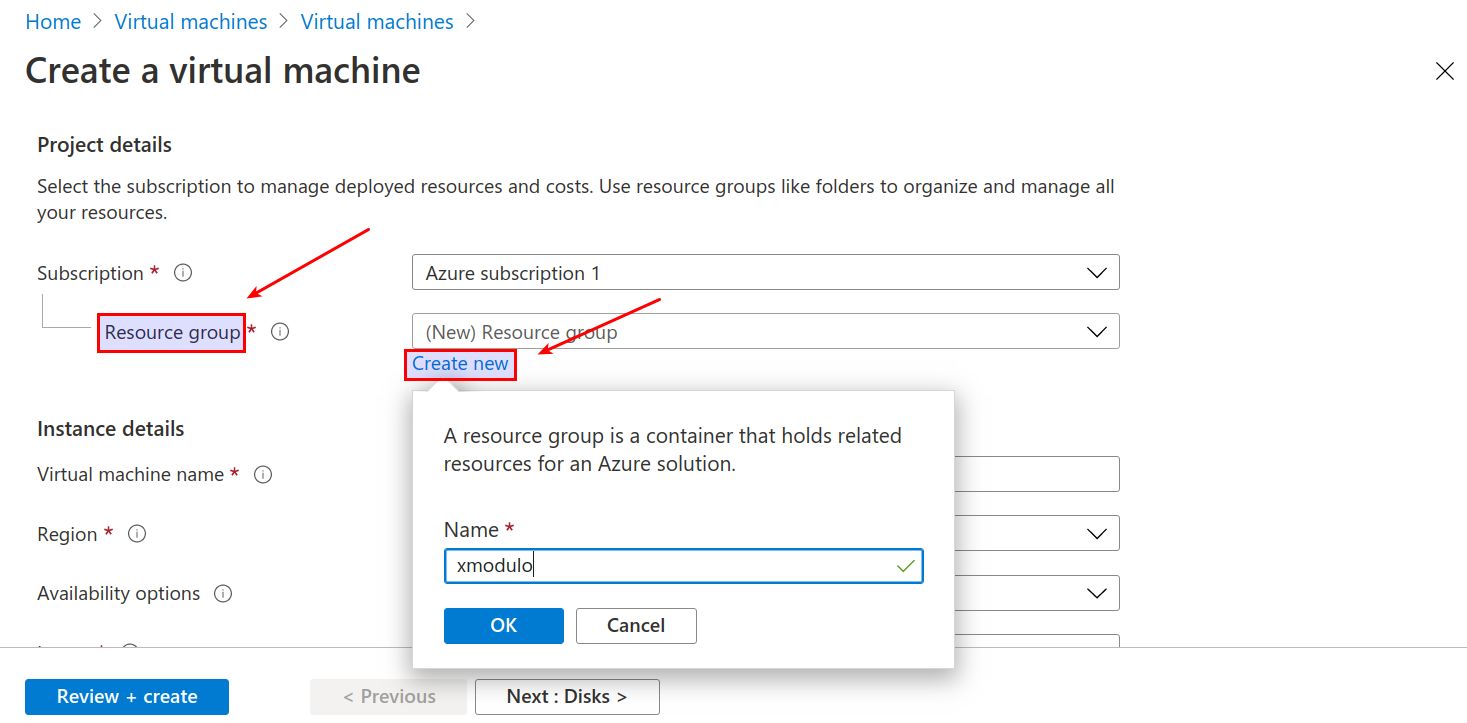
In Azure, a resource group is a term used to represent a logical collection of resources (e.g., VMs, disks, public IP address, etc) that are allocated for you at a particular geographic region. When you create a new VM, you need to designate which resource group you want to assign the VM to. If you have not defined any resource group yourself, it is recommended that you create one. You can create a new resource group at the time you create your first VM as shown below. Simply click on "Create new" under "Resource group" field and provide a name for a new resource group.
Step Three: Configure Basics
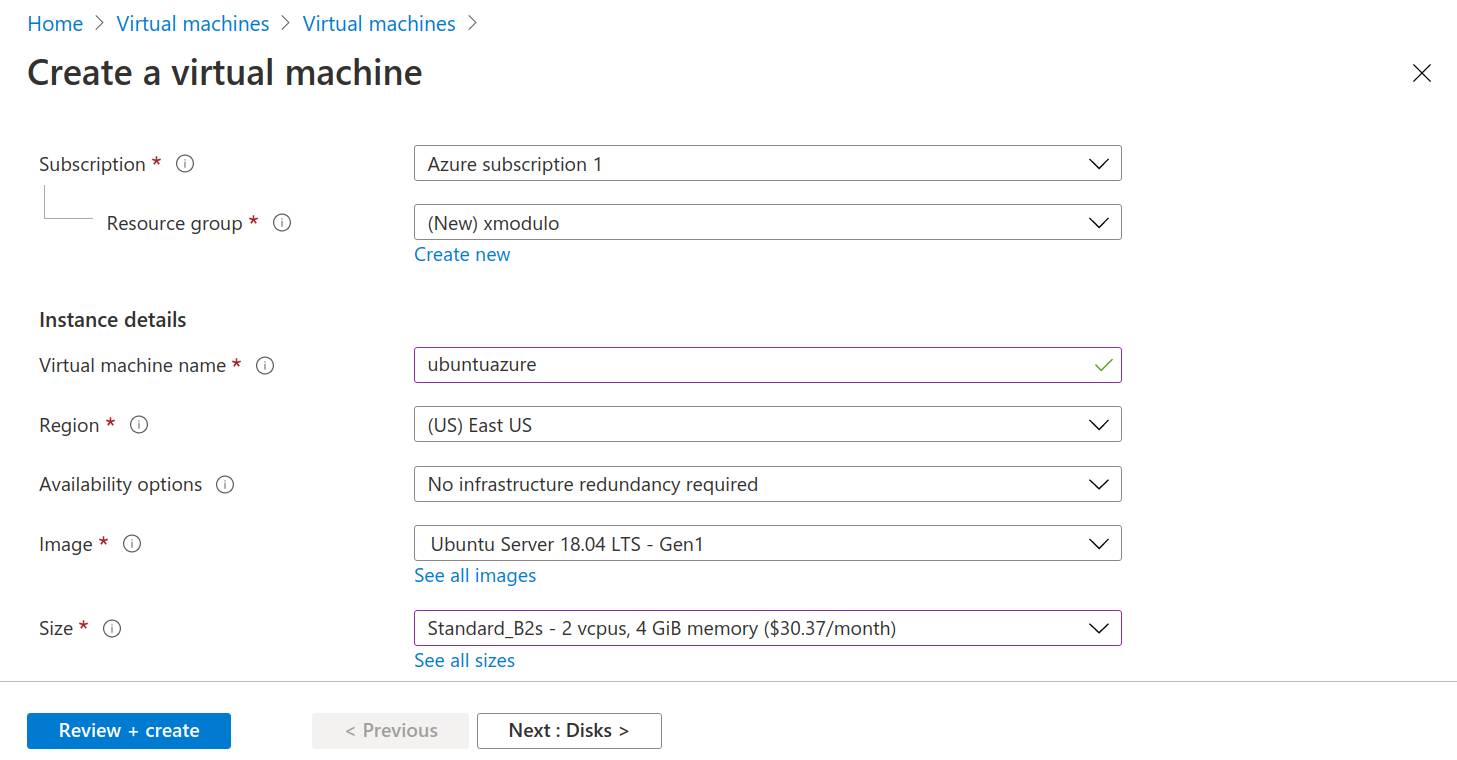
Next, fill out the "Virtual machine name" and Region fields for the VM. The virtual machine name you specify here will automatically be used as the initial hostname of the VM. Note that, while the VM's hostname can be freely changed by you later, the virtual machine name cannot be changed during the lifetime of the VM. The region you set for your VM will automatically be used as the location of the resource group you created above. Besides VM name and region, you also choose a VM size. The dropdown list will show you a list of available VM sizes at a chosen geographic region. Note that the monthly cost that appears is not the upfront cost you need to prepay. Rather, it is an estimated cost you would end up paying if you were to keep the VM running for the entire one month. In reality, you only pay for the amount of time the VM has been up and running. A VM can be stopped and restarted any time.
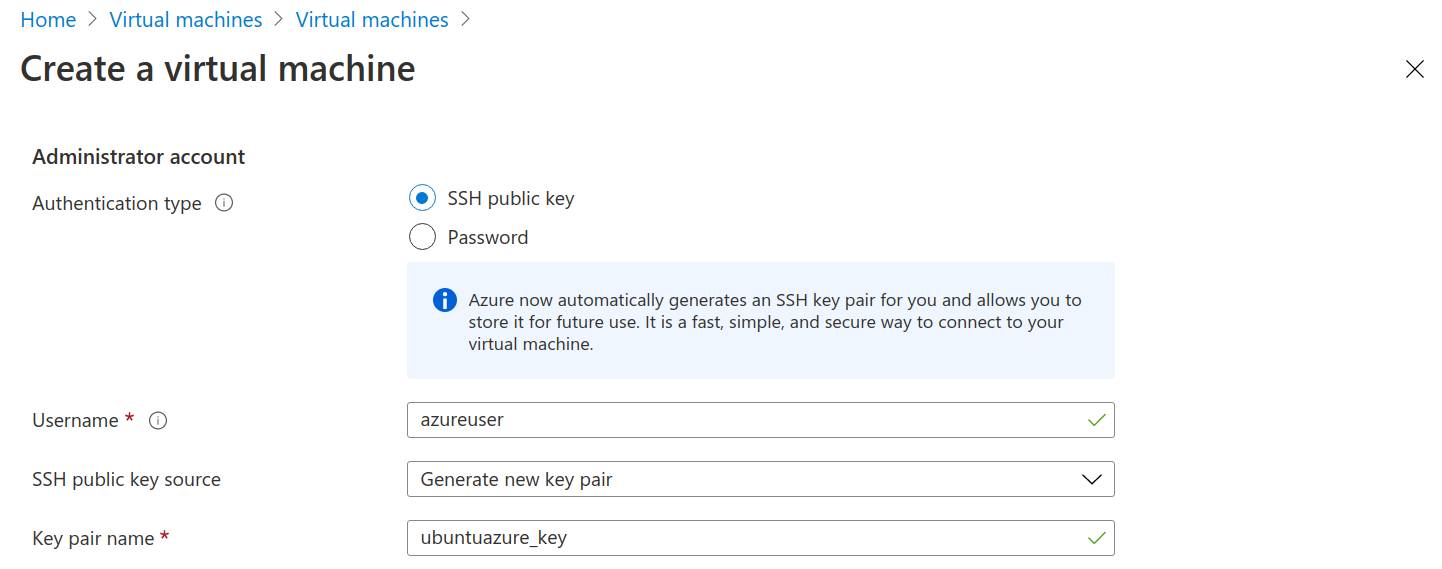
In order for you to access a VM securely, Azure allows you to choose an SSH key pair you want to use. You can either have a new key pair created by Azure as shown below, or use an existing key pair if you already have one at your computer. In the former case, a new key pair will be created by Azure and a private key will automatically be downloaded. In the latter case, you can copy and paste your existing public key into the "SSH public key" field of the Portal page.
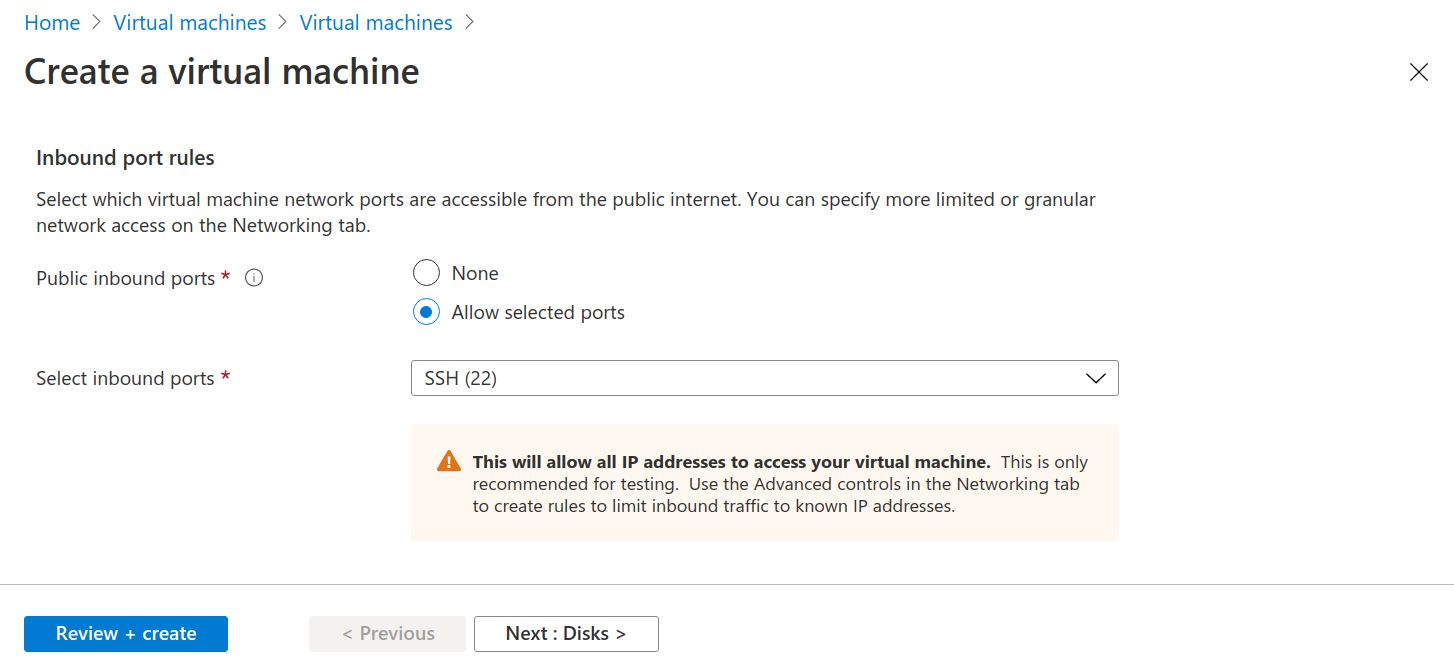
At this time you also have a chance to define default inbound port rules of your VM (i.e., which ports are accessible from the Internet). Here you can enable SSH, HTTP and/or HTTPS ports. Let's only enable SSH port for now. You can further customize the inbound rules in Step 5 below, or even after you create a VM.
Now move to Disks configuration.
Step Four: Configure Disks
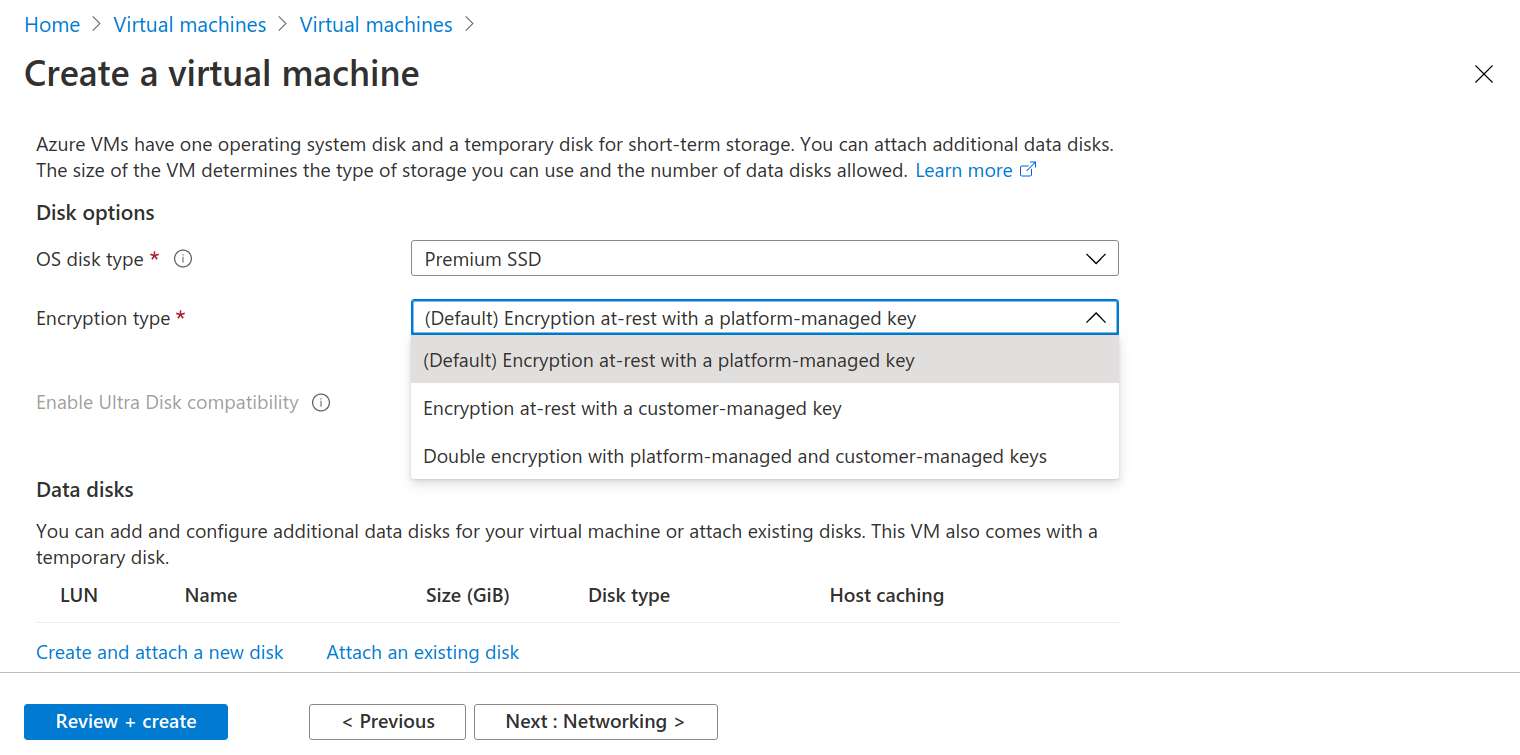
All Azure-managed disks are encrypted and decrypted transparently with 256-bit AES encryption keys. This is a free service enabled by default. Encryption keys are managed by the Azure platform by default, but you can use your own keys if you want.
Besides specifying an encryption type, you can add secondary disk(s) or attach existing disk(s) to the VM.
Go on to Networking configuration.
Step Five: Configure Networking
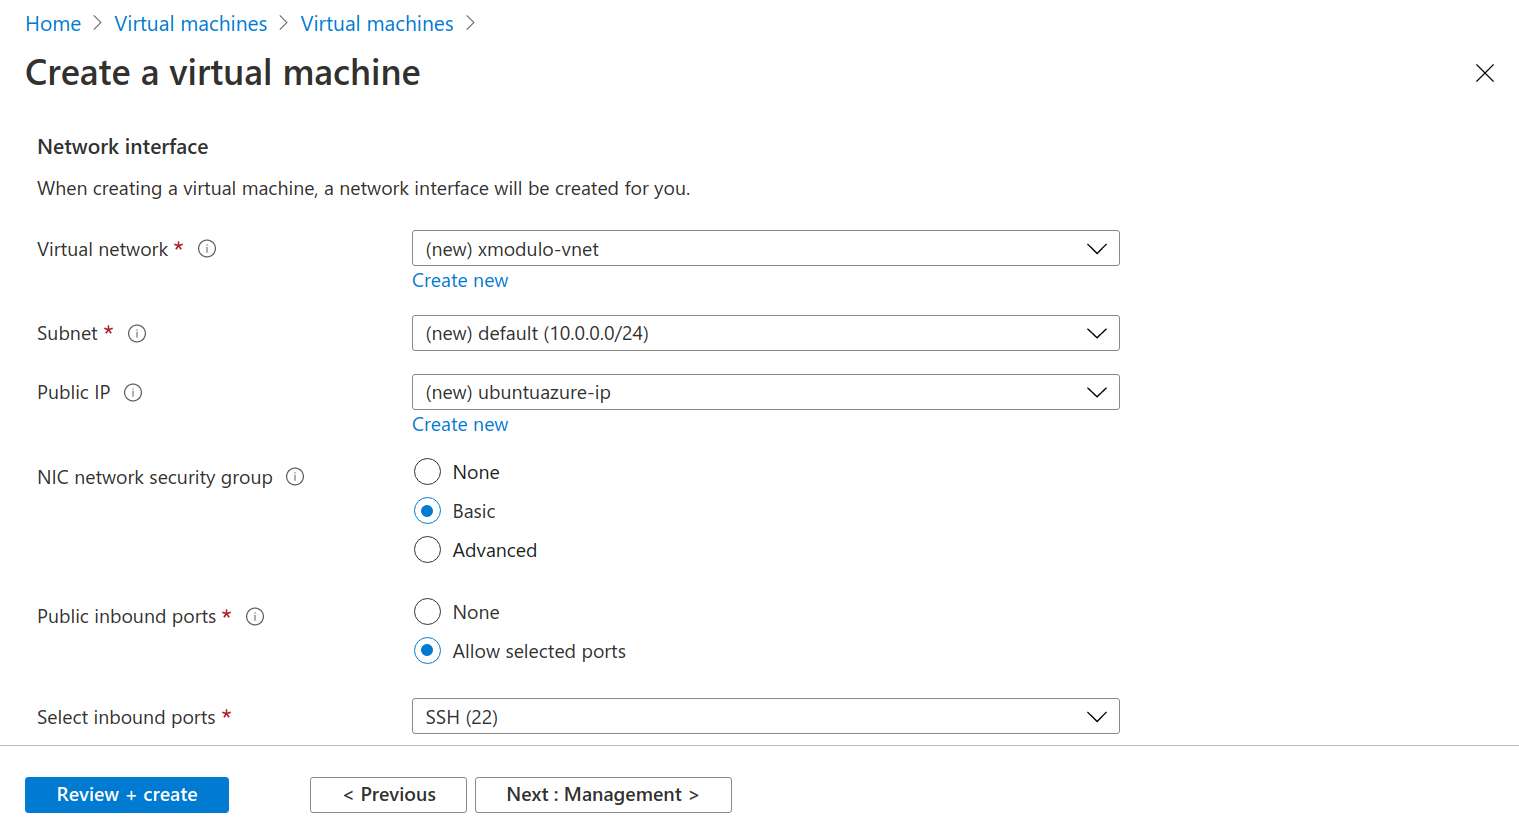
In the networking configuration, you can create your own virtual network with its own subnet, and configure a network security group for your VM. Especially, a network security group is an important property of your VM, where you specify firewall rules that control the inbound/outbound traffic to/from the VM. If you do not configure anything in either of these, Azure will create a default virtual network with a default subnet (10.0.0.0/24), and use a default network security group (Basic) which you configured in Step 3 (i.e., allow inbound SSH traffic). If you choose Advanced option for a network security group, you can customize the SSH inbound rule further (e.g., restrict the source of inbound SSH traffic) or add additional inbound/outbound rules. Note that you can customize the default network security group any time after the VM is up. Here I choose default settings for everything and move on.
Next, move on to Management.
Step Five: Configure Management
Azure offers various management services for your VM, e.g., boot diagnostics, identity-based access control, active directory, backup and recovery, etc. Unless you are interested in any of these, you can leave the default settings as is, and skip ahead.
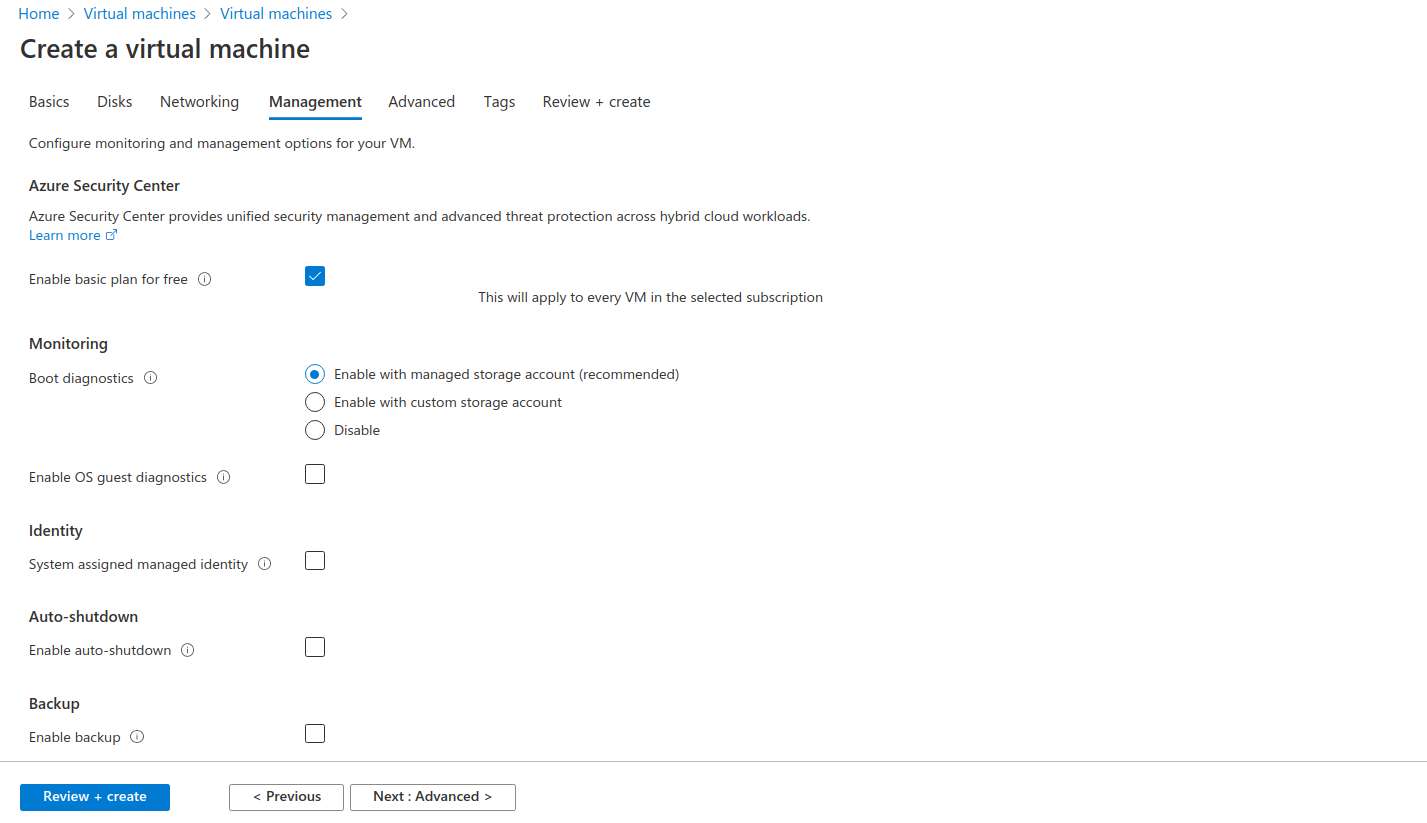
Unless you know what you are doing, you can skip the remaining configurations and finalize the creation procedure.
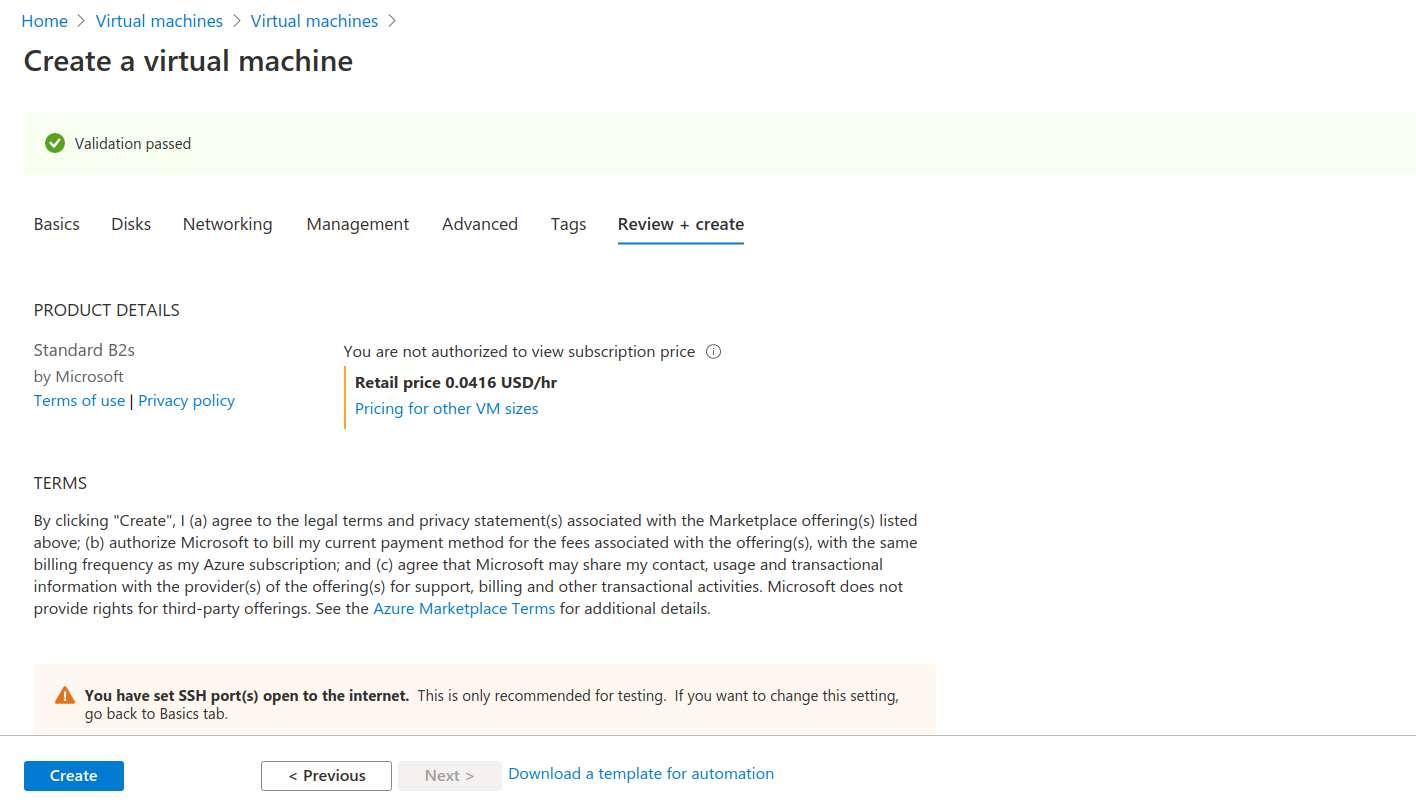
Step Six: Finalize and Launch
Click on "Review + create" button at the bottom. After reviewing the details, and go ahead and click on Create to launch the VM.
If you chose "Generate new key pair" option in Step 3, you will be prompted to download your private key at this point. Go ahead and download it (e.g., ubuntuazure_key.pem in this tutorial). Move the downloaded private key to your SSH config directory as follows. Don't forget to run chmodto restrict read access to yourself only.
$ mv ubuntuazure_key.pem ~/.ssh
$ chmod 400 ~/.ssh/ubuntuazure_key.pem

If you opted to use an existing SSH key pair in Step 3, you will not see the above screen.
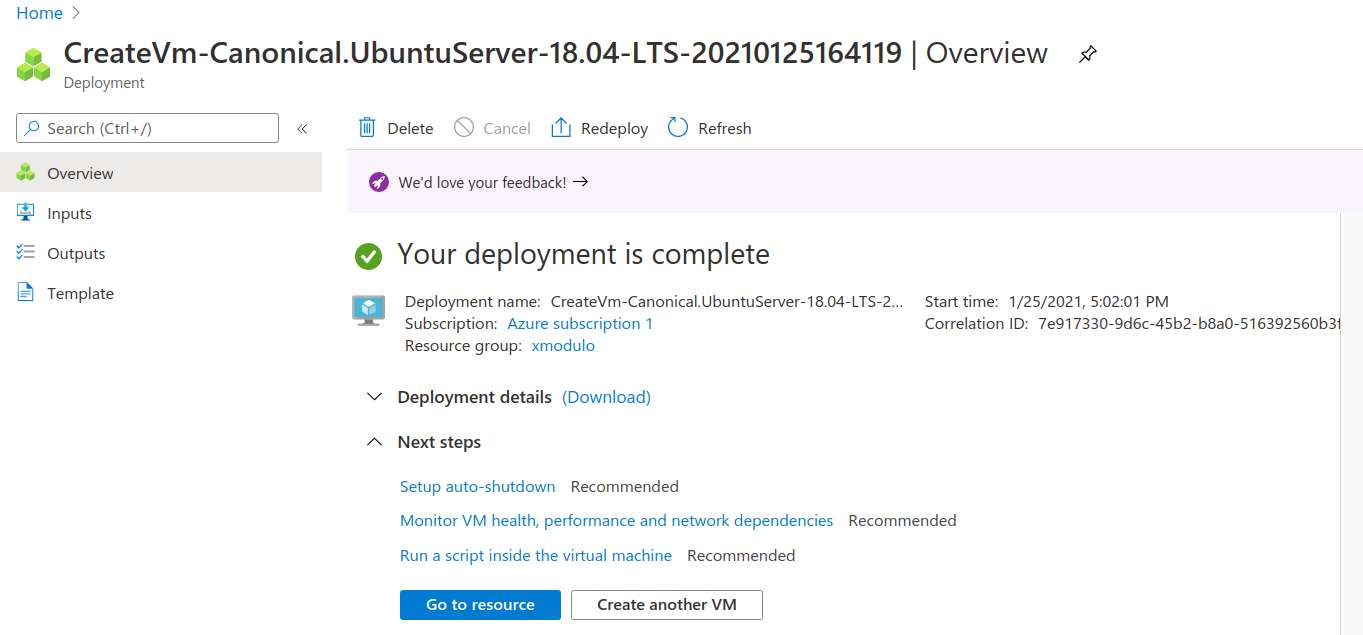
Once your VM is successfully launched, you will see the message that says "Your deployment is complete." To check the detail of your VM, click on "Go to resource" button.
In the VM overview page, you will find the public IP address assigned to your VM. Go ahead and SSH to the VM with the public IP address and whichever private key you specified in Step 3.
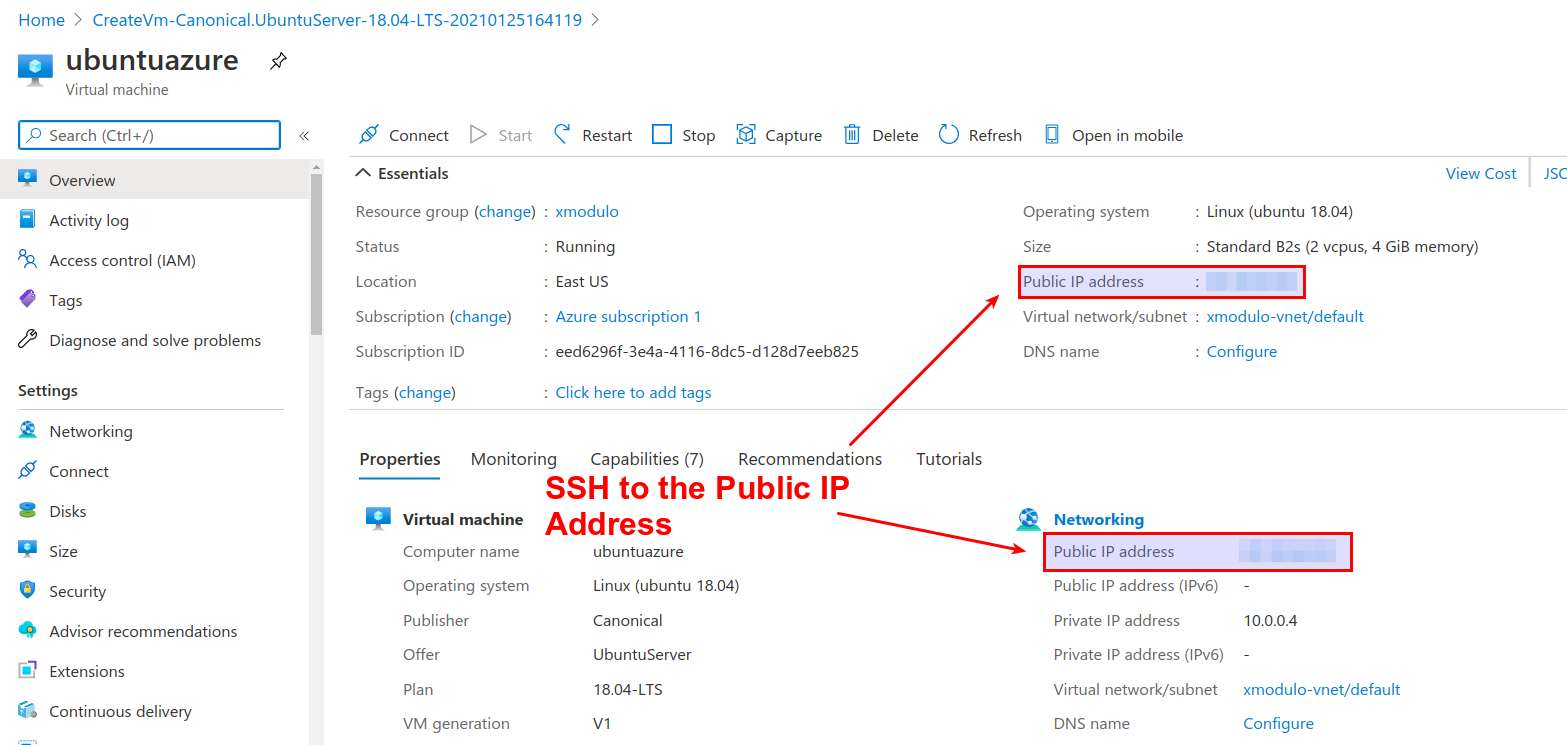
In this tutorial, I opted to generate a new key pair, and already placed the generated private key in ~/.ssh/ubuntuazure_key.pem. Thus, the following ssh command will work. Note that the default user for the VM is azureuser.
$ ssh -i ~/.ssh/ubuntuazure_key.pem azureuser@<public-IP-address>
It is also possible to use your SSH configuration file to specify the private key, the VM's IP address and login user. That way, you don't have to type them every time you run ssh command.
$ vi ~/.ssh/config
Host ubuntuaz
    HostName <public-IP-address>
    IdentityFile ~/.ssh/ubuntuazure_key.pem
    User azureuser
In the Host field in ~/.ssh/config, you can use any descriptive name (e.g., ubuntuaz). Once ~/.ssh/config is edited, you can SSH to your Azure VM simply by running:
$ ssh ubuntuaz
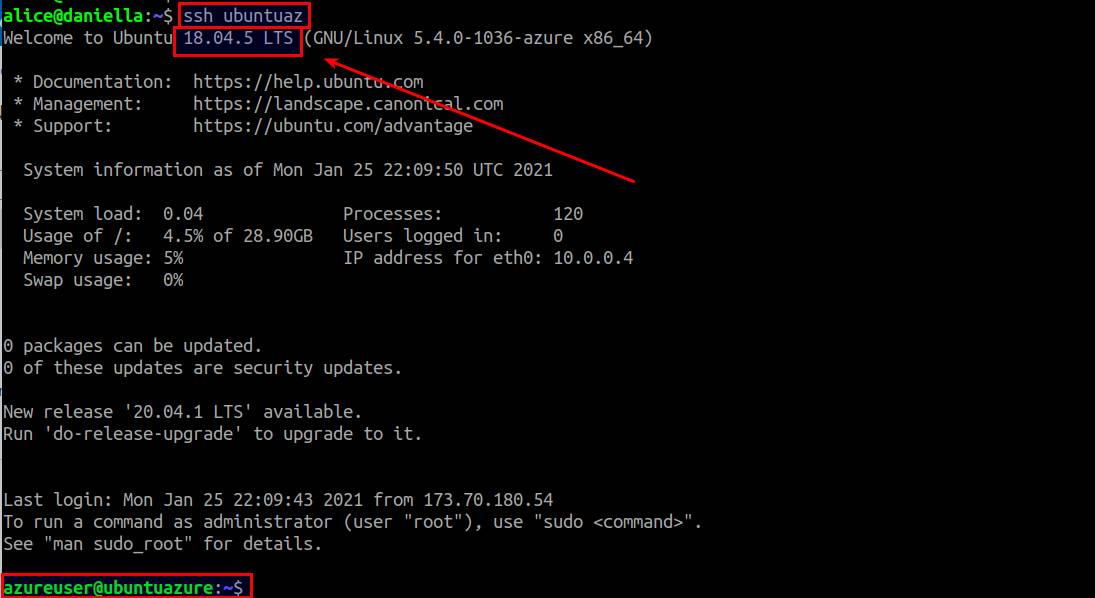
Congratulations! Now you are on your first Azure VM!
Summary
In this tutorial, I presented a step-by-step tutorial on creating a Linux VM on Azure. Currently Ubuntu images available on Azure are all based on Ubuntu server. If your use case desires Ubuntu desktop, you can install a desktop environment on a Ubuntu server VM.
Once a VM is up and running, you can stop and restart the VM any time. Any data created or packages installed on the VM will not be lost. Azure does not charge you for the VM hours while the VM is stopped. However, even when the VM is stopped, you will still be charged for the disk(s) that are attached to the stopped VM as they remain provisioned for you. Keep that in mind while playing with a VM.
What is your experience with Azure, and what is your thought on it? Feel free to share it in the comments.
Support Xmodulo
This website is made possible by minimal ads and your gracious donation via PayPal or credit card
Please note that this article is published by Xmodulo.com under a Creative Commons Attribution-ShareAlike 3.0 Unported License. If you would like to use the whole or any part of this article, you need to cite this web page at Xmodulo.com as the original source.

Xmodulo © 2021 ‒ About ‒ Write for Us ‒ Feed ‒ Powered by DigitalOcean