How to configure fail2ban to protect Apache HTTP server
Last updated on September 25, 2020 by Dan Nanni
Apache web server in production environments can be under attack in various different ways. Attackers may attempt to gain access to unauthorized or forbidden directories by using brute-force attacks or executing evil scripts. Some malicious bots may scan your websites for any security vulnerability, or collect email addresses or web forms to send spams to.
Apache HTTP server comes with comprehensive logging capabilities capturing various abnormal events indicative of such attacks. However, it is still non-trivial to systematically parse detailed Apache logs and react to potential attacks quickly (e.g., ban/unban offending IP addresses) as they are perpetrated in the wild. That is when fail2ban comes to the rescue, making a sysadmin's life easier.
fail2ban is an open-source intrusion prevention tool which detects various attacks based on system logs and automatically initiates prevention actions e.g., banning IP addresses with iptables, blocking connections via /etc/hosts.deny, or notifying the events via emails. fail2ban comes with a set of predefined jails which use application-specific log filters to detect common attacks. You can also write custom jails to deter any specific attack on an arbitrary application.
In this tutorial, I am going to demonstrate how you can configure fail2ban to protect your Apache HTTP server. I assume that you have Apache HTTP server and fail2ban already installed. Refer to another tutorial for fail2ban installation.
What is a Fail2ban Jail?
Let me go over more detail on fail2ban jails. A jail defines an application-specific policy under which fail2ban triggers an action to protect a given application. fail2ban comes with several jails pre-defined in /etc/fail2ban/jail.conf, for popular applications such as Apache, Dovecot, Lighttpd, MySQL, Postfix, SSH, etc. Each jail relies on application-specific log filters (found in /etc/fail2ban/fileter.d) to detect common attacks. Let's check out one example jail: SSH jail.
[ssh]
enabled   = true
port      = ssh
filter    = sshd
logpath   = /var/log/auth.log
maxretry  = 6
banaction = iptables-multiport
This SSH jail configuration is defined with several parameters:
[ssh]:the name of a jail with square brackets.enabled:whether the jail is activated or not.port:a port number to protect (either numeric number of well-known name).filter:a log parsing rule to detect attacks with.logpath:a log file to examine.maxretry:maximum number of failures before banning.banaction:a banning action.
Any parameter defined in a jail configuration will override a corresponding fail2ban-wide default parameter. Conversely, any parameter missing will be assgined a default value defined in [DEFAULT] section.
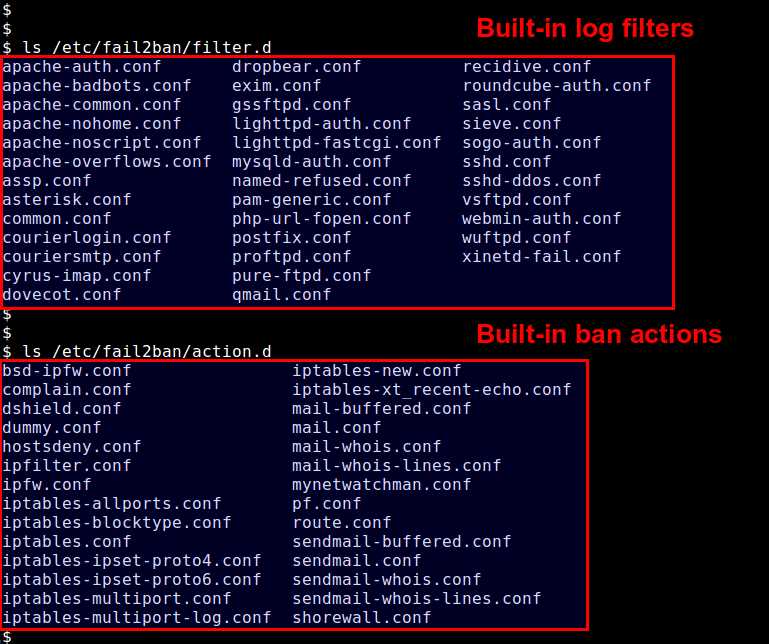
Predefined log filters are found in /etc/fail2ban/filter.d, and available actions are in /etc/fail2ban/action.d.
If you want to overwrite fail2ban defaults or define any custom jail, you can do so by creating /etc/fail2ban/jail.local file. In this tutorial, I am going to use /etc/fail2ban/jail.local.
Enable Predefined Apache Jails
Default installation of fail2ban offers several predefined jails and filters for Apache HTTP server. I am going to enable those built-in Apache jails. Due to slight differences between Debian and Red Hat configurations, let me provide fail2ban jail configurations for them separately.
Enable Apache Jails on Debian or Ubuntu
To enable predefined Apache jails on a Debian-based system, create /etc/fail2ban/jail.local as follows.
$ sudo vi /etc/fail2ban/jail.local
# detect password authentication failures
[apache]
enabled  = true
port     = http,https
filter   = apache-auth
logpath  = /var/log/apache*/*error.log
maxretry = 6

# detect potential search for exploits and php vulnerabilities
[apache-noscript]
enabled  = true
port     = http,https
filter   = apache-noscript
logpath  = /var/log/apache*/*error.log
maxretry = 6

# detect Apache overflow attempts
[apache-overflows]
enabled  = true
port     = http,https
filter   = apache-overflows
logpath  = /var/log/apache*/*error.log
maxretry = 2

# detect failures to find a home directory on a server
[apache-nohome]
enabled  = true
port     = http,https
filter   = apache-nohome
logpath  = /var/log/apache*/*error.log
maxretry = 2
Since none of the jails above specifies an action, all of these jails will perform a default action when triggered. To find out the default action, look for banaction under [DEFAULT] section in /etc/fail2ban/jail.conf.
banaction = iptables-multiport
In this case, the default action is iptables-multiport (defined in /etc/fail2ban/action.d/iptables-multiport.conf). This action bans an IP address using iptables with multiport module.
After enabling jails, you must restart fail2ban to load the jails.
$ sudo service fail2ban restart
Enable Apache Jails on CentOS/RHEL or Fedora
To enable predefined Apache jails on a Red Hat based system, create /etc/fail2ban/jail.local as follows.
$ sudo vi /etc/fail2ban/jail.local
# detect password authentication failures
[apache]
enabled  = true
port     = http,https
filter   = apache-auth
logpath  = /var/log/httpd/*error_log
maxretry = 6

# detect spammer robots crawling email addresses
[apache-badbots]
enabled  = true
port     = http,https
filter   = apache-badbots
logpath  = /var/log/httpd/*access_log
bantime  = 172800
maxretry = 1

# detect potential search for exploits and php vulnerabilities
[apache-noscript]
enabled  = true
port     = http,https
filter   = apache-noscript
logpath  = /var/log/httpd/*error_log
maxretry = 6

# detect Apache overflow attempts
[apache-overflows]
enabled  = true
port     = http,https
filter   = apache-overflows
logpath  = /var/log/httpd/*error_log
maxretry = 2

# detect failures to find a home directory on a server
[apache-nohome]
enabled  = true
port     = http,https
filter   = apache-nohome
logpath  = /var/log/httpd/*error_log
maxretry = 2

# detect failures to execute non-existing scripts that
# are associated with several popular web services
# e.g. webmail, phpMyAdmin, WordPress
port     = http,https
filter   = apache-botsearch
logpath  = /var/log/httpd/*error_log
maxretry = 2
Note that the default action for all these jails is iptables-multiport (defined as banaction under [DEFAULT] in /etc/fail2ban/jail.conf). This action bans an IP address using iptables with multiport module.
After enabling jails, you must restart fail2ban to load the jails in fail2ban.
On Fedora or CentOS/RHEL 7:
$ sudo systemctl restart fail2ban
On CentOS/RHEL 6:
$ sudo service fail2ban restart
Check and Manage fail2ban Banning Status
Once jails are activated, you can monitor current banning status with fail2ban-client command-line tool.
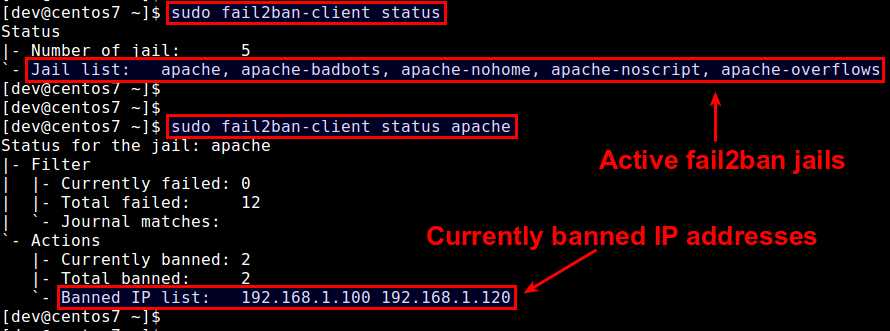
To see a list of active jails:
$ sudo fail2ban-client status
To see the status of a particular jail (including banned IP list):
$ sudo fail2ban-client status [name-of-jail]
You can also manually ban or unban IP addresses.
To ban an IP address with a particular jail:
$ sudo fail2ban-client set [name-of-jail] banip [ip-address]
To unban an IP address blocked by a particular jail:
$ sudo fail2ban-client set [name-of-jail] unbanip [ip-address]
Summary
This tutorial explains how a fail2ban jail works and how to protect an Apache HTTP server using built-in Apache jails. Depending on your environments and types of web services you need to protect, you may need to adapt existing jails, or write custom jails and log filters. Check outfail2ban's official Github page for more up-to-date examples of jails and filters.
Are you using fail2ban in any production environment? Share your experience.
Support Xmodulo
This website is made possible by minimal ads and your gracious donation via PayPal or credit card
Please note that this article is published by Xmodulo.com under a Creative Commons Attribution-ShareAlike 3.0 Unported License. If you would like to use the whole or any part of this article, you need to cite this web page at Xmodulo.com as the original source.

Xmodulo © 2021 ‒ About ‒ Write for Us ‒ Feed ‒ Powered by DigitalOcean